Wednesday, December 11, 2013

Cookies 'n' Cream Fudge

I just want to say... 1,000 page views! Thank you everyone for visiting my blog! It motivates me to keep posting! I simply would like to add that I would really, really (did I say really?) appreciate comments and feedback!
Now onto the food! Who doesn't love fudge, and who doesn't love Oreos?! Let me say that when they are mixed together, the result is magical unicorns jumping over rainbows. Haha, well maybe not, but it is still very delicious! I have had to ban my dad from the fudge for his own good, because I think he is addicted now.
This is certainly a good recipe that I will bring out each holiday season from now on. Fudge is a great item to put in a holiday sweets gift!


Cookies 'n' Cream Fudge

Ingredients:

3/4 cup salted butter
1 cup granulated sugar
1 (5 oz.) can evaporated  milk
2 (12 oz.) packages white chocolate chips
1 (7 oz.) jar marshmallow fudge
3 cups coarsely chopped Oreo cookies, divided
Pinch of salt

Instructions:

1. Line a 9″ square pan with foil, set aside.
2. Combine butter, sugar, and evaporated milk in a medium saucepan.
3. Cook over medium-high heat, stirring constantly, until mixture comes to a boil. Cook 3 minutes, stirring constantly.
4. Remove from heat, add white chocolate chips, marshmallow cream, 2 cups chopped cookies, and salt. Stir until chips melt.
5. Pour fudge into prepared pan. Sprinkle remaining 1 cup chopped cookies over fudge, gently press cookies into fudge.
6. Cover and chill until firm (about 1 to 2 hours). Enjoy!!
 
*Note: You can add more Oreos according to you liking.
 
~Enjoy! - Gabi xoxo~


Wednesday, December 4, 2013

Graham Cracker Toffee

Christmas music, Christmas trees, Christmas atmosphere! It is only the fourth day of December and already I am in the Christmas spirit, to the max. The Christmas tree was just put up today and it looks spectacular! It is a family tradition to all go together and saw down the tree by hand. It may take some work, but it makes memories.

This recipe for Graham Cracker Toffee is one from my mom, and let me just say that I've probably gained about 500 pounds from eating it. It is so addicting!


Graham Cracker Toffee

Ingredients:

1 stick margarine
1 stick unsalted butter
1/2 cup granulated sugar (has to be this kind)
Graham Crackers
1 bag milk chocolate chips

Instructions:

1. Preheat oven to 350 degrees F. Line 9x13 cooking pan with parchment or aluminum paper.
2. In medium saucepan, cook butter, margarine, and sugar until frothy. Once frothy, cook for 2-3 ore minutes.
3. Pour half of mixture on pan and spread. Evenly place graham crackers on pan and pour second half of mixture over top and spread evenly. Place in oven for 8 minutes,
4. Sprinkle chocolate chips and place pan back in oven for 1-2 minutes, or just until chocolate in melted. Take out of oven and spread chocolate out evenly.
5. Place pan in freezer until chocolate is fully hardened. Break into 1 or 2 inch pieces. Enjoy the weight gain!! :)
 
~Enjoy! - Gabi xoxo~


Tuesday, December 3, 2013

Grinch Cookies

How was everyone's Thanksgiving? Mine was phenomenal! It was a lovely day that was spent gorging on turkey, sweet potatoes, and anything pumpkin! Also, football played a major role in the day, as did Black Friday Shopping!
It was my first ever experience of the mad rush of shoppers. it was fun though, and I got great deals on gifts and a new phone for myself (I couldn't help it :p). I was in North Carolina, so their malls are HUGE! Maybe not for them, but for this girl they seemed like a labyrinth of stores!
Now that Thanksgiving is time to begin the Christmas baking extravaganza! It is the perfect time of year to bake all the time without people thinking your weird. I also love giving the things I make away.
As it was the first day of December yesterday, I decided to pay tribute to the Grinch himself. Grinch cookies are minty, but also chocolatey! Yum!!


If you can't tell, the cookies are green!!


Grinch Cookies

Ingredients:

1 cup unsalted butter, melted
3/4 cup granulated sugar
3/4 cup brown sugar
2 medium eggs
1/2 tsp. vanilla extract
1 tsp. mint extract
1 tsp. baking soda
1 tsp. salt
3 cups all-purpose flour
1 1/2 cup Andes Candies baking chips
1/2 cup milk chocolate chips
Blue & Yellow food coloring

Instructions:

1. Preheat oven to 350 degrees F.
2. In medium mixing bowl, beat butter and sugars together until somewhat smooth. Add in eggs and beat until full incorporated.
3. Add in drops of food coloring. You will need to decide what shade of green you want, so experiment.
4. Mix in vanilla, mint, baking soda and salt until fully incorporated. Next, add in flour and beat until it becomes a thicker cookie dough. Add in Andes Candies and chocolate chips. Stir.
5. With cookie scoop, disperse onto pan of whatever size. Bake for 7-8 minutes.
 
~Enjoy! - Gabi xoxo~ 


Thursday, November 21, 2013

Billionaire Bars

Thanksgiving is jus around the corner! I LOVE Thanksgiving time, especially this year, because my family and I are traveling to Kentucky to see the Creation Museum, and then we are going to North Carolina until after Thanksgiving. My dad's family lives in Salisbury, NC, so that is where I will be shoving my face for the week. :)
I'm really excited, because my sister is on break from N.C. State University where she has a gymnastics scholarship (I'm so proud of her!). I miss my sister greatly and enjoy the time we have together.
The Thanksgiving atmosphere is incredible! A parade, football, family time, goofing off, turkey, all the women of the family cooking and baking together, and last, but certainly not least, the time we get to say what we are thankful for. We each go around the room and say one or two things we are thankful for. And for the day after Thanksgiving,  forget Black Friday shopping, I will be snuggling up in a blanket listening to Christmas music. my family's tradition regarding music is that we cannot listen to Christmas music until the day after Thanksgiving. YAY!
Now, onto the actual reason for this post... ;) I was craving chocolate, and cookie dough, and shortbread, and more chocolate (a.k.a. I was craving calories to the max!). Billionaire Bars are delicious and absolutely worth those extra crunches and miles. I have no idea why they are called 'Billionaire' Bars. Maybe because they are worthy of the taste buds of a billionaire.
 

Topped with milk chocolate, filled with cookie dough, and all on top of shortbread, it is easy to see why these bars are so popular (not to mention yummy)!


Billionaire Bars

Ingredients:

For the Shortbread:
1/3 cup unsalted butter, softened or melted
1/3 cup granulated sugar
1/2 tsp. vanilla extract
1/4 tsp. salt
1 cup all-purpose flour
 
For the Cookie Dough:
1/2 cup unsalted butter, softened
1/2 cup brown sugar
1/4 cup granulated sugar
2 Tbsp. heavy cream (if you don't have heavy cream, you can substitute half-and-half)
1/2 tsp. vanilla extract
3/4 cup all-purpose flour (you may need to add a little more until it acquires the 'cookie dough' consistency.)
Pinch of salt
1/2 -2/3 cup of chocolate chips (can also use mini chips)
 
For Chocolate Topping:
1 1/2 cup of milk chocolate
1 Tbsp. unsalted butter

Instructions:

1. Preheat oven to 350 degrees F. Line an 8x8 pan with parchment paper, leaving a 1-inch overhang on two sides.
2. Making the Shortbread. In a medium mixing bowl, beat together butter and sugar until light and fluffy, about 2-3 minutes. Add in vanilla and salt and beat until combined. add in flour and mix, dough may appear slightly crumbly. Firmly press into prepared pan. Poke sever shallow holes into the surface with a knife or fork. Bake 15-18 minutes, or until lightly golden around the edges.
3. Making the Cookie Dough. In medium mixing bowl, beat together butter and sugars until light and fluffy, about 2-3 minutes. Mix in the heavy cream and vanilla; mix well. Add in the salt and flour (may need to add more flour) and mix until fully incorporated. Stir in the chocolate chips. Spread the cookie dough layer evenly onto the shortbread once it has fully cooled. Refrigerate the pan while you prepare the chocolate topping.
4. Making the Chocolate Topping. This can be done several way. You can put the chocolate and butter in a bowl and melt them in the microwave, you can melt them in a pan on the stove, or you can simply melt them all in a chocolate melter. Melt until completely melted and smooth. Spread the chocolate topping over the cookie dough layer and chill until set, about 30 minutes. Enjoy the richness of it!
 
*Note: You are totally getting annoyed of this, I know, but please, please, PLEASE! Comment! I feel like these posts are just seen and I do put quite a bit of work into them. So if I could get any type of feedback that would be stellar!
 
~Enjoy! - Gabi xoxo~


Tuesday, November 5, 2013

Gooey Funfetti Bars

Since I thought I had the day off, I decided to bake. Unfortunately my boos called to see if I could come in and work. I, being the person I am, couldn't say no. But I still wanted to bake today, so I decided on this quick, easy, and yummy recipe.

I was able to whip these up in a flash and they were so easy incredibly easy to eat...I mean make! ;) You can use whatever kind of sprinkles you want, or whatever color you would like to consume. Wow! Is my hunger coming out in my typing. Well I will just grab a few more bars and I will be good to go!


Gooey Funfetti Bars

Ingredients:

1 box of yellow cake mix
1 stick of unsalted butter (1/2 cup), melted
1 egg
2/3 cup rainbow sprinkles (feel free to use whatever kind you like. I used the round, harder sprinkles.)
1/2 chocolate chips
1/2 white chocolate chips
1/2 cup sweetened condensed milk

Instructions:

1. Preheat oven to 350 degrees F. Grease 9x9 pan.
2. In medium mixing bowl, combine cake mix, melted butter, and egg. mix until it becomes dough. Stir in 1/3 cup of the sprinkles.
3. In greased pan, evenly flatten 2/3 of dough. Then, evenly sprinkle all chocolate chips onto pressed dough.
4. Pour sweetened condensed milk over chocolate chips and dough, making sure to pour evenly. With remaining dough, roll into small balls and place in pan. Press down to flatten.
5. Put in oven and bake for approximately 30 minutes or a little more.
6. Let cool completely before cutting, or you can simply eat it out of the pan like I did!
 
~Enjoy! - Gabi xoxo~


Saturday, November 2, 2013

Sorry!

I'm really sorry, but I realized that on the recipe for Chocolate Chip Rolo Cookies it said 1 tsp. baking powder when it should have said 1 tsp. baking soda. I have since changed it, and would just like to say I'm sorry for not catching it. My apologies if you made the recipe and it turned out kind of funny!

Friday, November 1, 2013

Chocolate Chip Rolo Cookies

Last night was All Hallows Eve, or Halloween. I wanted to make it special for all the little kiddos in my neighborhood, so I decided to bake cookies for them instead of give out the regular mini candy bars. 

I had to think of something that kids love and I immediately thought of Chocolate Chip Cookies, so I started making them. But then I decided that I needed to make them special, so I searched my kitchen and happened upon some bags of Rolo's. Light bulb!

I put the Rolo in between the cookie dough and ta-da! A Chocolate Chip Rolo Cookie was born! The cookies were a hit, and I even had some kids come back for seconds, not that I minded.

 
A regular Chocolate Chip Cookie on the outside, but a surprise in the middle!
 

Chocolate Chip Rolo Cookies

Ingredients:

1 cup unsalted butter, melted
3/4 cup brown sugar, packed
3/4 cup granulated sugar (I used raw sugar)
2 medium eggs
1 tsp. vanilla extract
1 tsp. baking soda
1 tsp. salt
3 cups all-purpose flour
1/2 a bag of Rolo Candies

Instructions:

1. Preheat oven to 350 degrees F.
2. In medium mixing bowl, cream melted butter, sugar and eggs. About 2 minutes. Beat in vanilla, baking powder, salt and flour until fully incorporated.
3. Get a large non-stick cookie pan. With a small cookie scooper, place dough on pan and flatten with unwrapped Rolo. Get another, bigger, scoop and flatten slightly. Place dough on top of Rolo and press down lightly till both dough's meet. Repeat with the rest of cookie dough.
4. Place in oven and bake for 9-10 minutes. Take out and let cool slightly. Enjoy!

*Note: FYI I tripled the recipe just so I would have enough to give to every kid (with e few left over for me :)).
 
~Enjoy! - Gabi xoxo~

Thursday, October 31, 2013

Pumpkin Pie Truffles

So, earlier this week I had the opportunity to go to a square dance. It took place in a beautifully refurbished barn, perfectly decorated for autumn. I was told to bring something to share, and of course I immediately jumped at the chance to try out one of my new recipes. I searched and searched for the perfect recipe until I finally settles on Pumpkin Pie Truffles.

Let me just say that they were the favorite food at the party, brownie points for me! :) They were gone in a matter of seconds (hardly an exaggeration!). Dipped in chocolate, they are the perfect finger food for a party, without the mess.
 
 
I decorated mine just to make them look even more appealing!

Pumpkin Pie Truffles

Ingredients:

1 1/2 cup brown sugar
1 1/2 cup sugar
3/4 cup butter
1/2 cup milk
3/4 cup canned pumpkin puree
pinch of salt
1 tsp cinnamon
1/2 tsp ground ginger
1/2 tsp ground nutmeg
1/2 tsp ground cloves
1/4 tsp allspice
3 cup white chocolate morsels
20 marshmallows (regular sized)
1 tsp vanilla extract
24 oz vanilla candy coating (I used milk chocolate)

Instructions:

1. In large pot, mix sugars, butter, milk, pumpkin, cinnamon, salt, ginger, nutmeg, cloves and allspice. Stir and bring to a boil. Continue to boil over medium heat for 10 minutes. Remove from heat.
2. Stir in white chocolate morsels, vanilla, and marshmallows until melted. Mixture will get thick and dull. Pour into a mixing bowl (or use a hand-held mixer) and beat for about 2 minutes until smooth consistency.
3. Place mixing bowl with fudge in refrigerator to set about 30-60 minutes. Using a small scoop, or tablespoon, scoop out balls of fudge, roll, and place on baking sheet. Once all fudge is rolled, melt the candy coating. Using a toothpick, dip each truffle into the melted chocolate, tap the side of the dish to let the excess run off, then set on a parchment lined baking sheet. Repeat for all truffles.
4. Refrigerate for best flavor!
 
 
*Note: Sorry if this is getting bothersome, but PLEASE comment because I would LOVE feedback, whether it is just a comment, a critique, a question, or advice. I will welcome all comments! Also, comment if there is a certain recipe you want me to do! Feedback, negative or positive, will be accepted and taken into mind. Thank you!
 
~Enjoy! - Gabi xoxo~


Wednesday, October 23, 2013

Homemade Marshmallows

So the temperature in my house is approximately -32 degrees! (just kidding) It is very cold, and so I wanted to make hot cocoa and snuggle down into my heating blanket while I wrote an essay. But alas, when I went to check the cupboards for marshmallows there were none. I decided to make my own since now that I was out of my blankets warm there was no going back.

This recipe was so incredibly easy (a lot easier than I thought) and they melt almost instantly in you hot cocoa! Just be patient because I was not and I burnt my tongue, which almost everybody knows, kills!
 
 
These are delicious, and if you put them in hot cocoa, try adding a dash of cinnamon, which is my special touch.
 

Homemade Marshmallows

Ingredients:

3 1/2 envelopes (2 tablespoons plus 2 1/2 teaspoons) unflavored gelatin
1 cup cold water, divided
2 cups granulated sugar
1/2 cup light corn syrup
1/4 teaspoon salt
2 large egg whites
1 tablespoon vanilla
powdered sugar, as needed, about 1 cup

Instructions:

1. Spray a 9x13 glass or metal pan with cooking spray. Dust the pan with powdered sugar.
2.Sprinkle the gelatin over a half cup of the cold water in the bowl of your stand mixer fitted with the wire whisk. Let soften.
3.In a  sauce pan, cook the second half cup of cold water, sugar, corn syrup, and salt over low heat, stirring with a wooden spoon until the sugar has dissolved. Increase heat to medium and boil until mixture reaches 240 degrees, about 12 minutes.
4. Remove pan from the heat and pour the sugar mixture into the stand mixer with the gelatin. Stir to dissolve the gelatin.Beat on high speed until white, thick, tripled in volume, about 6 minutes.
5.In a medium bowl, beat the egg whites until stiff peaks have formed.  Mix the egg whites and vanilla into the sugar mixture until just combined.
6.Pour the mixture into the prepared baking dish, using a rubber spatula to scrape it out as needed, but being careful not to touch the goo with your hands. You won't get it all out of the bowl and that's okay.
7.Sift 1/4 cup of powdered sugar over the top of the marshmallows and chill uncovered in the fridge for 3 hours or overnight.
8.Run a knife along the edges of the pan and turn the marshmallows out onto a cutting board. Cut marshmallows into 1-inch cubes with a sharp knife or pizza cutter.
9.Sift about 1/2 cup of powdered sugar back into the baking dish and toss the cut marshmallows in it to coat all sides and prevent them from sticking to each other.
10.Shake off the excess powdered sugar and store in an airtight container.
 
~Enjoy! - Gabi xoxo~


Sunday, October 13, 2013

Pumpkin Pull-Apart Bread

Yesterday was a downpour of rain, gather over 5 inches! Since I had already made my Pumpkin Pie Dip, I decided to make something warm that just oozed Autumn bliss. It is the kind of dessert that you can grab a plate of and just snuggle down into a heavy blanket.
 
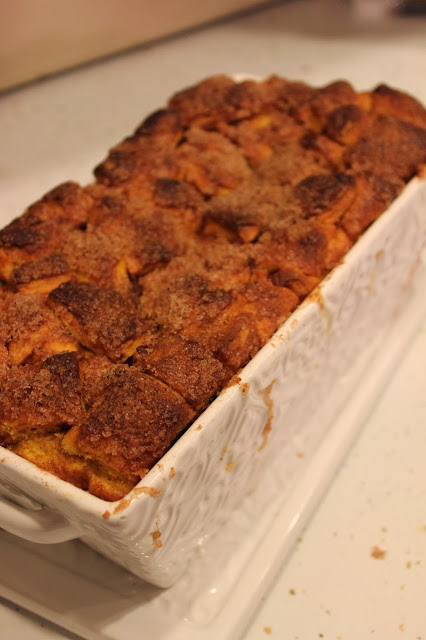
My second dessert that I made last night for my Autumn Dinner Party, is one of my personal favorites. It is just the perfect amount of cinnamon and pumpkin. It may look like monkey bread, but it is ten times better. Over time I have perfected this recipe and am so proud to share it with you!
 
On a little side note, please feel free to comment and I would really appreciate feedback! Now back to the recipe :)
 
 
I have a guilty pleasure, and that is to pick off the top, crispy pieces, but the inside is just as good!


Pumpkin Pull-Apart Bread

Ingredients:

Bread:
2 Tbsp. unsalted butter
1/2 cup milk
2 1/4 tsp. (1 envelope) active dry yeast
3/4 cup canned pumpkin (about 1/2 the can)
1/4 cup white sugar
1 tsp. salt
2 1/2 cups bread flour
 
 1 cup granulated sugar
2 tsp. ground cinnamon
1/2 tsp. ground nutmeg
2 Tbsp. unsalted butter
 
Buttered Rum Glaze:
4 Tbsp. unsalted butter
1/4 cup brown sugar
3 Tbsp. milk
3/4 cup powdered sugar (may need to add more for thickness)

 Instructions:

1. In a saucepan over medium-high heat, brown 2 Tbsp. of butter, letting it bubble up and turn a dark golden brown, but don't let it burn (turn blackish). Once browned, remove the pan from heat and add in the milk, return to stove and heat through.
2. Pour the milk and butter into a large mixing bowl and allow to cool till it is warm but no longer hot. Once is has reached a warm temperature, add in the yeast and 1/4 cup of sugar. Allow to proof (this can take up to 8 minutes, the top should look foamy and the liquid cloudy).
3. Add in pumpkin, salt, and 1 cup of flour. Stir until combined, and then add in rest of flour 1/2 cup at a time and knead for 5-6 minutes. Dough should be smooth and elastic and slightly sticky.
4. Move dough to a lightly oiled bowl and cover with a clean towel. Allow to rise in a warm place for 60-90 minutes or until doubled in size.
5. After dough has finished rising, brown another 2 Tbsp. of butter. Add the sugar, cinnamon, and nutmeg and mix well.
6. Grease and flour a 9x5 loaf pan and set aside.
7. Once dough has doubled in size, punch it down and flip out onto a clean floured surface. Roll dough onto a 20x12 inch rectangle.
8. Evenly sprinkle dough with cinnamon sugar mixture and press into the dough. Cut the dough into 1-1 1/2 inch strips, the  into 1 inch squares. Stack squares of dough randomly into bread pan, making sure it is still evenly covered. Cover with clean towel and let rise again for 30-45 minutes.
9. Preheat oven to 350 degrees F. After rising, bake bread for 30-35 minutes, or until top is a deep golden brown.
10. To prepare the glaze, heat the butter, milk and brown sugar in a small saucepan. Bring to a boil the immediately remove the pan from the stove and stir in the powdered sugar.
11. Serve and enjoy!
 
*Note: This recipe is time consuming and the directions regarding the bread rising need to be follow correctly. It is worth the time but into it, so don't despair!
 
 ~Enjoy - Gabi xoxo~


Saturday, October 12, 2013

Pumpkin Pie Dip

Last night was my Autumn Dinner Party, and is went of smashingly! It was a smaller, more intimate, dinner and we had good talks. After dinner we watched "The Great Gatsby" as we are all literature freaks.

The first thing I made was a Pumpkin Pie Dip. I started out with cream cheese, but then I totally forgot what else was in the recipe and I couldn't find  it anywhere. So now I will share with you my brand new Pumpkin Pie Dip recipe!

 
And I dipped either gingersnap cookies or graham crackers. I personally prefer the gingersnap cookies.
 

Pumpkin Pie Dip

Ingredients:

1 can of pumpkin puree
1 8oz. package of cream cheese, softened
1 regular container of Cool Whip
2 ½ tsp. Pumpkin Spice
3 ½ cups confectionary sugar
1/2 cup brown sugar

 Instructions:

1. In bowl, beat cream cheese, cool whip, canned pumpkin, pumpkin spice, confectionary sugar, and brown sugar.
2. Let chill in fridge for 1-2 hours.
3. Serve with gingersnap cookies, graham crackers, etc. Enjoy!

*Note: More confectionary sugar may need to be added to get the right fluffiness.
 
~ Enjoy! - Gabi xoxo~
 

Thursday, October 3, 2013

Chocolate Chip Oreo Brownie Bars

After an extremely long day of classes, a searing headache, and friend drama, I just needed to unwind. Some people might get a massage, or have a glass of wine. I on the other hand chose to bake and eat away my troubles.
What better way to relax then to chow down on chocolate chip cookies, Oreos, and brownies all at the same time! I enjoyed all of these in the company of my two little brothers, all the while watch the Emperor's New Groove.
Chocolate Chip Oreo Brownie Bars need such a long name to live up to the deliciousness that it holds. One piece can be a meal in itself with how yummy and filling it is!


Chocolate Chip Cookie Dough acts as the crust for the bars.


And then comes the Oreos!
 
 
Then the brownie mix is added ...Yahh! It's ready to eat!


 Chocolate Chip Oreo Brownie Bars

Ingredients:

Chocolate Chip Cookie Dough:
2 stick unsalted butter, melted
3/4 cup granulated sugar
3/4 cup brown sugar, packed
2 eggs
1 tsp. vanilla
1 tsp. baking soda
1 tsp. salt
3 cups all-purpose flour
1 package milk chocolate chips
Oreo Layer:
1 package of Oreo's
Brownie:
1 package of brownie mix
1/4 cup water
1/2 cup vegetable oil
2 eggs

Instructions:

1. Preheat oven to 350 degrees F. Grease 9x13 pan.
2. In medium mixing bowl, cream butter, sugar, and eggs. Add in vanilla, baking soda, and salt. Mix until incorporated. Beat in flour, 1 cup at a time. Add in all, but 1/4 cup, of chocolate chips.
3. Put cookie dough into 9x13 pan and press into an even layer.
4. Place Oreos into cookie dough, lightly pressing them into dough. (Oreos can be crushed up if desired)
5.Into another medium bowl, pour in brownie mix, water, oil, and eggs. Mix until fully combined and there is barely any chunks remaining. Pour brownie batter evenly over Oreos. Sprinkle remaining 1/4 cup of chocolate chips over brownie batter.
6. Cook for 35-40 minute (Mine took about 35 minutes). Do not over bake!


Note: If you have any comment or questions, or even advice I would greatly appreciate it!!
 
~Enjoy! - Gabi xoxo


Wednesday, September 25, 2013

Apple Crisp Bars

So, I went out to coffee with my nearest and dearest friend, Olivia. We had a nice heart-to-heart in Starbucks drinking our Pumpkin Spice Latte's (which are to die for!). I have not had a good talk like that in ages! Anyway, as we were talking we were naming off, randomly, the foods that we love about autumn. That got me thinking about Apple Crisp, but I tend to not want a whole, hunkin' piece.
And from that emerged the idea to make Apple Crisp Bars.

I had seen several recipes on Pinterest, but almost all of the had nuts in them. On a side note I am DEATHLY allergic to ALL nuts. So the Pinterest recipes were a no-go. Oh well, I decided to experiment and create my own.

As it turned out they were delicious, and they were even better with a scoop of vanilla ice cream! The only  problem is, is that I wish I had made more.


Apple Crisp Bars

Ingredients:

Crust:
1/3 cup unsalted butter, melted
1/3 cup granulated sugar
1/2 tsp. vanilla extract
1/4 tsp. salt
1 cup all-purpose flour
 
Filling:
3-4 big apples (preferably Granny Smith)
2 Tbsp. butter
2 Tbsp. granulated sugar
1 tsp. cinnamon
2 Tbsp. water

Topping:
4 Tbsp. butter, room temperature
5 Tbsp. brown sugar
5 Tbsp. all-purpose flour
1 tsp. cinnamon

Instructions:

1. Preheat oven o 350 degrees F. Line an 8x8-inch pan with parchment paper, leaving about 1-inch overhanging on the sides.
2. Make crust: in mixing bowl, beat together butter and sugar until light and fluffy; 2-3 minutes. Add vanilla and salt, beat until combined. Add flour and mix until incorporated, dough may appear slightly crumbly. Firmly press into pan. Poke shallow holes into dough with fork. Bake 18-22 minutes, or until edges are lightly golden,
3. Make filling: Peel, core, and slice apples. Put them in sauce pan, along with sugar, water, cinnamon, and butter. Cover and cook over low heat for about 13 minutes, or until slices soften. Remove lid and cook a little longer until the liquid evaporates. Cool completely. When crust and filling are cooled, spread apple filling on top of the crust.
4. Make topping: Mix together butter, brown sugar, flour, and cinnamon. Should become crumbly (may need to add in more flour and sugar). Sprinkle evenly over apple filling. Bake for 15-20 minutes, or until it is dark golden brown.
5. To serve: Let cool slightly. Cut into bar-like rectangles, then pull out of pan by parchment paper.
 
~Enjoy! - Gabi xoxo~

Sunday, September 22, 2013

Broccoli & Cheese Quiche

As today marks autumn's arrival, I thought it only suitable to bake accordingly. Therefore for a nice sit-down Sunday dinner I decided to let my family be my taste-testers for my first ever quiche. With a bit of apprehension they agreed, and it turns out they loved it! Which it great because I am thinking about making it for a dinner I am having in October with some friends.

I thought that if my family loved then I had better share it with others to get their verdict on the quiche before I serve it to my friends. With fresh broccoli, sharp cheddar and Swiss cheese it is hard to go wrong. There is seriously nothing better than a cup of chai tea and broccoli quiche...Well unless you count jumping in leaves, hot cider, baking with pumpkin, pumpkin carving, and fall clothing, but that is beside the point.
 
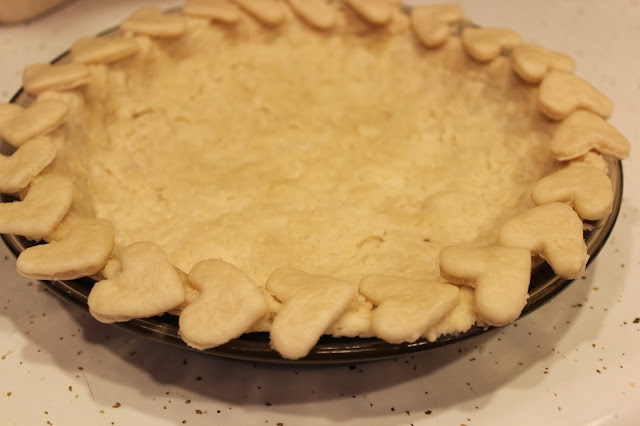
Yes, I did make my own crust, but it was very time consuming!
 
 
And just because I had spent so much time on the crust already, I added a little flair.
 
 
The finished project! Ta-da!
  

Broccoli & Cheese Quiche

Ingredients:
 
1/4 cup olive oil
2 cups broccoli, cut into florets (the amount may vary with however much broccoli you want)
1 small onion, finely chopped
3 garlic cloves, minced
1 uncooked pie pastry shell
4 eggs
1 cup whole milk (it really is up to you which kind you want to use)
1/2 tsp. salt
1/2 tsp. pepper
1/2 cup shredded sharp cheddar cheese, divided
1/2 cup shredded Swiss Cheese, divided
 
Instructions:
 
1. Preheat oven to 375 degrees F.
2. In large skillet, heat oil over medium-high heat. Add broccoli and onion; cook and stir until broccoli in crisp-tender. Stir in garlic cloves; stir and cook for 4-5 minutes longer.
3. Fill pie crust with broccoli mixture. In a small bowl, whisk eggs, milk, salt and pepper. Stir in 1/4 cup of cheddar and 1/4 cup of Swiss; pour over vegetables. Sprinkle with remaining cheese.
4. Bake for 30-35 minutes or until a knife inserted near the center comes out clean. Let stand 10-15 minutes before cutting.
 
Notes:
 This recipe is so easy that it would be quite simple to substitute in different vegetables or even meat. You can also substitute cheeses if so desired.
 
~Enjoy! - Gabi xoxo~


Saturday, September 14, 2013

Cinnamon White Cake

I bake a lot! Because of my love and slight obsession for baking, I decided to start a blog. I will post recipes that I have done before, and also experimental recipes, letting you know how they turn out. Anyway, now that that is said, let's get down to baking.

Autumn is almost upon us, and so, to appease my ever growing taste for fall I just HAD to bake something. So, I took advantage of the chillier weather today and put on my jeans and a sweater, put my hair in girly braids and started baking. It took me a while to decide what exactly I wanted to bake and when I decided I wanted cinnamon, I settled on this delicious Cinnamon White Cake.
       
With the perfect amount of cinnamon, this cake is easy and quick (nice for when you have a sudden craving for fall). It tastes like you slaved over it for hours, when really it is quite speedy.
 
I have many dreams and aspirations, and maybe I'll do a whole post on just that in detail, but baking is a passion and to do it as a job would just make me the happiest person!
When I was going through the toughest year of my life, so far, my junior year, whenever I was stressed or in a mad mood, I would drop whatever I was doing and bake. It was something that calmed me and took my mind off of the stresses of my teenage life.
 I found that I had a gift for it and my love for baking grew over time as I learned more recipes and was finally able to make some of my own.
Well enough about why I started baking, lets get onto the recipe.


It is absolutely to die for when it is still warm, and I added a streusel topping just because I can!


Cinnamon White Cake

Ingredients:
 
1/3 cup brown sugar
1 tsp. ground cinnamon
2/3 cup white sugar (I used raw sugar)
1/2 cup unsalted butter, softened
2 eggs
1 1/2 tsp. vanilla extract
1 1/2 cups all-purpose flour
1 3/4 tsp. baking powder
1/2 cup milk

Streusel Topping (optional):

1 tsp. cinnamon
4 Tbsp. all-purpose flour
4 Tbsp. brown sugar
4 Tbsp. unsalted butter, softened

Instruction:

1. Preheat oven to 350 degrees F. Grease a 9x5 bread pan.
2. Beat together white sugar and butter until smooth and creamy. Beat in eggs until fully combined. Add in vanilla extract.
3.Mix in milk, flour, and baking powder. Mix until combined. Pour half of batter into greased 9x5 bread pan. sprinkle in brown sugar and cinnamon, combined. Make swirls in batter with toothpick or knife. Then, pour last of batter in pan, and sprinkle last of the brown sugar and cinnamon mixture. Again make swirls.
4. For streusel, combine all ingredients until it is somewhat crumbly (may need to add in more flour). Sprinkle over batter, evenly.
5. Bake until toothpick comes out clean when inserted. About 30-40 minutes.
 
~Enjoy! - Gabi xoxo~